Install
Falco can be used for Kubernetes runtime security. The most secure way to run Falco is to install Falco directly on the host system so that Falco is isolated from Kubernetes in the case of compromise. Then the Falco alerts can be consumed through read-only agents running in Kubernetes.
You can also run Falco directly in Kubernetes as a Daemonset using Helm, see the third-party integrations
There are 2 main ways to install the Falco binary on your host:
- Falco packages (
.deb,.rpm) - Falco binary (
.tar.gz)
These packages include the default configuration and Falco rules files.
The installation of the kernel driver varies depending on the type of driver and your setup. The sections below outline the available options, building upon the information provided in the previous Download guide.
Falco packages
The Falco packages shipped with Falco 0.34 support for the first time other drivers besides the kernel module. The new systemd units' names are:
falco-bpf.servicefalco-kmod-inject.servicefalco-kmod.servicefalco-modern-bpf.servicefalco-custom.servicefalcoctl-artifact-follow.service(related to Falcoctl tool, see next sections)
This is still an experimental solution so our suggestion is to avoid relying on Falco systemd unit names since they could change between releases. The final idea would be to have a single falco.service configurable through usual systemd logic, but due to how Falco works today this solution is not viable.
Even if different units are available, you shouldn't run multiple Falco in parallel! Our units are not meant to be run in parallel!
Each driver option has different kernel requirements, explore the support matrix.
On January 18th, 2023 the GPG key used to sign Falco packages has been rotated. Check out the related blog post and make sure you're using the most up-to-date key available at falco.org/repo/falcosecurity-packages.asc, and that you read the section below about package signing.
Installation details
Before looking at the installation on different distros, let's focus on what we should expect when we install the package.
The Falco package will look into your system for the dialog binary, if the binary is there, the package will prompt a simple configuration dialog, otherwise, it will install the unit files without starting any systemd service.
Note: If you don't have the
dialogbinary installed on your system a manual configuration is always required to start Falco services.
Even if you have the dialog binary installed, you can disable the interactive prompt by using the FALCO_FRONTEND env variable, you should simply set its value to noninteractive when installing the package.
Also, if you wish to skip the interactive prompt but still be able to set a custom driver, you can use FALCO_DRIVER_CHOICE env variable, setting it to kmod, ebpf or modern_ebpf.
At the same time, you can also enable the falcoctl automatic ruleset by setting FALCOCTL_ENABLED to a non empty string.
The latter environment variables are also useful when you don't want to install dialog binary at all.
FALCO_FRONTEND=noninteractive apt-get install -y falco
Let's see an example of how to install the package in a Debian-like system, for example, Ubuntu.
Trust the
falcosecurityGPG keycurl -fsSL https://falco.org/repo/falcosecurity-packages.asc | \ sudo gpg --dearmor -o /usr/share/keyrings/falco-archive-keyring.gpgConfigure the apt repository
echo "deb [signed-by=/usr/share/keyrings/falco-archive-keyring.gpg] https://download.falco.org/packages/deb stable main" | \
sudo tee -a /etc/apt/sources.list.d/falcosecurity.list
In older releases of Debian (Debian 9 and older ones), you might need to additionally install the package apt-transport-https to allow access to the Falco repository using the https protocol.
The following command with install that package in your system:
$ sudo apt-get install apt-transport-https
Update the package list
sudo apt-get update -yInstall some required dependencies that are needed to build the kernel module and the eBPF probe
sudo apt install -y dkms make linux-headers-$(uname -r) # If you use falcoctl driver loader to build the eBPF probe locally you need also clang toolchain sudo apt install -y clang llvm # You can install also the dialog package if you want it sudo apt install -y dialogNote: You don't need to install these deps if you want to the modern eBPF probe
Install the Falco package
sudo apt-get install -y falco
Installation with dialog
If you have the dialog binary installed on your system, you will be prompted with this:

From here you can choose one of our 3 drivers Kmod, eBPF, Modern eBPF or a Manual configuration.
Here we select the Kmod case as an example. After the first dialog, you should see a second one:
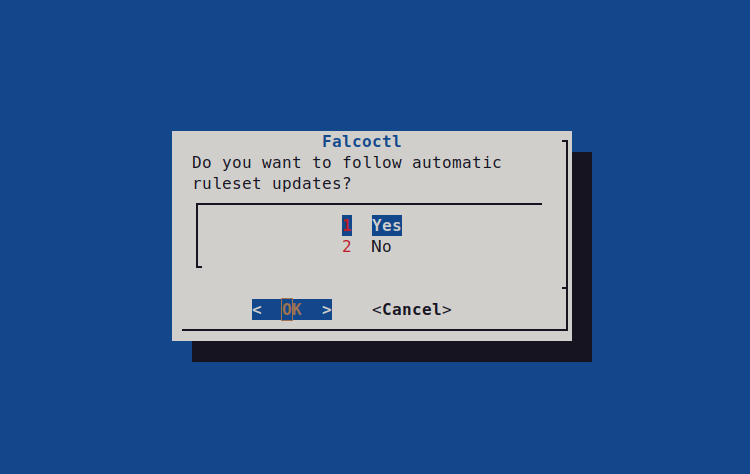
Rule update
Falcoctl is a tool revamped with Falco 0.34 that offers shiny new features! One of the most important is the automatic rulesets update,
our suggestion is to enable it by default, in this way you will always have your Falco instance running with the most updated rules.
If you set the rule update as default, typing systemctl list-units | grep falco you should see something similar to this:
falco-kmod-inject.service                         loaded active exited    Falco: Container Native Runtime Security with kmod, inject.
falco-kmod.service                                loaded active running   Falco: Container Native Runtime Security with kmod
falcoctl-artifact-follow.service                  loaded active running   Falcoctl Artifact Follow: automatic artifacts update service
falco-kmod-inject.serviceinjects the kernel module and exits. This unit remains after exit to detach the kernel module when thefalco-kmod.servicewill be stopped.falco-kmod.serviceinstance of Falco running the kernel module. Since the kernel module is the default Falco driver, you can also use thefalcoalias to start/stop it once enabled.falcoctl-artifact-follow.serviceinstance of Falcoctl that searches for new rulesets. This unit will be stopped whenfalco-kmod.serviceterminates.
The Falcoctl service is strictly related to the Falco one:
- when the Falco service starts it searches for a unit called
falcoctl-artifact-follow.serviceand if present it starts it. Please note that following this pattern, if you enable the Falco service and you reboot your system, Falcoctl will start again with Falco even if you don't enable it throughsystemd enable! You can disable this behavior by stopping the Falcoctl service and masking itsystemctl mask falcoctl-artifact-follow.service. - when the Falco service stops also the Falcoctl service is stopped.
No Rule update
In this case, the Falco package will only start the falco-kmod.service. Typing systemctl list-units | grep falco you should see something similar to this:
falco-kmod-inject.service                         loaded active exited    Falco: Container Native Runtime Security with kmod, inject.
falco-kmod.service                                loaded active running   Falco: Container Native Runtime Security with kmod
In this mode, the Falcoctl service is masked by default so if you want to enable it in a second step you need to type systemctl unmask falcoctl-artifact-follow.service.
Final remarks on the dialog
When you choose a driver from the dialog (in our case Kmod), the systemd service is always enabled by default so it will start at every system reboot. If you want to disable this behavior type systemctl disable falco-kmod.service (if you are using the kernel module like in this example). If enabled, the Falcoctl service will follow the same behavior as Falco so it is enough to disable the Falco service.
Installation without dialog (Manual configuration)
If you remember well, in the dialog we also had the Manual configuration. This option installs only the Falco units into the system without starting any service, this is the equivalent of not having the dialog binary installed on the system.
Since no service is started, you have to manually configure services after the installation phase. You can see an example of how to configure the falco-bpf service in the Running section
Installation on different Distros
We have already seen the installation steps on a Debian-like system, let's see some other Distros.
CentOS/RHEL/Fedora/Amazon Linux
Trust the
falcosecurityGPG keyrpm --import https://falco.org/repo/falcosecurity-packages.ascConfigure the yum repository
curl -s -o /etc/yum.repos.d/falcosecurity.repo https://falco.org/repo/falcosecurity-rpm.repoUpdate the package list
yum update -yInstall some required dependencies that are needed to build the kernel module and the eBPF probe
# If necessary install it using: `yum install epel-release` (or `amazon-linux-extras install epel` in case of amzn2), then `yum install make dkms`. yum install -y dkms make # If the package was not found by the below command, you might need to run `yum distro-sync` in order to fix it. Rebooting the system may be required. yum install -y kernel-devel-$(uname -r) # If you use falcoctl driver loader to build the eBPF probe locally you need also clang toolchain yum install -y clang llvm # You can install also the dialog package if you want it yum install -y dialogNote: You don't need to install these deps if you want to use the modern eBPF probe
Install the Falco package
yum install -y falcoUninstall Falco:
yum erase -y falco
You might need to validate the driver signature if your system has UEFI SecureBoot enabled.
Follow these steps to do so:1. Import the DKMS Machine Owner Key $ sudo mokutil --import /var/lib/dkms/mok.pub 2. Restart the system and wait for the MOK key enrollment prompt 3. Choose the option: Enroll MOK 4. Load the Falco driver $ insmod /var/lib/dkms/falco/4.0.0+driver/$(uname -r)/x86_64/module/falco.ko.xz
openSUSE
Trust the
falcosecurityGPG keyrpm --import https://falco.org/repo/falcosecurity-packages.ascConfigure the zypper repository
curl -s -o /etc/zypp/repos.d/falcosecurity.repo https://falco.org/repo/falcosecurity-rpm.repoUpdate the package list
zypper -n updateInstall some required dependencies that are needed to build the kernel module and the eBPF probe
zypper -n install dkms make # If the package was not found by the below command, you might need to run `zypper -n dist-upgrade` in order to fix it. Rebooting the system may be required. zypper -n install kernel-default-devel-$(uname -r | sed s/\-default//g) # If you use falcoctl driver loader to build the eBPF probe locally you need also clang toolchain zypper -n install clang llvm # You can install also the dialog package if you want it zypper -n install dialogNote: You don't need to install these deps if you want to use the modern eBPF probe
Install Falco:
zypper -n install falcoUninstall Falco:
zypper rm falco
Falco binary
In these steps, we are targeting a Debian-like system on x86_64 architecture. You can easily extrapolate similar steps for other distros or architectures
Download the latest binary:
curl -L -O https://download.falco.org/packages/bin/x86_64/falco-0.37.1-x86_64.tar.gzInstall Falco:
tar -xvf falco-0.37.1-x86_64.tar.gz
cp -R falco-0.37.1-x86_64/* /
Install some required dependencies that are needed to build the kernel module and the eBPF probe. If you want to use other sources like the modern eBPF probe or plugins you can skip this step.
apt update -y
apt install -y dkms make linux-headers-$(uname -r)
# If you use falcoctl driver loader to build the eBPF probe locally you need also clang toolchain
apt install -y clang llvm
Use
falcoctl drivertool to configure Falco and install the kernel module or the eBPF probe. If you want to use other sources like the modern eBPF probe or plugins you can skip this step.
To install the driver, write and execution permissions on the /tmp directory are required, since falcoctl will try to create and execute a script from there.
# If you want to use the kernel module, configure Falco for it
falcoctl driver config --type kmod
# If you want to use the eBPF probe, configure Falco for it
falcoctl driver config --type ebpf
# Install the chosen driver
falcoctl driver install
By default, the falcoctl driver install command tries to download a prebuilt driver from the official Falco download s3 bucket. If a driver is found then it is inserted into ${HOME}/.falco/. Otherwise, the script tries to compile the driver locally, for this reason, you need the dependencies at step [3].
You can use the env variable FALCOCTL_DRIVER_REPOS to override the default repository URL for prebuilt drivers. The URL must not have the trailing slash, i.e. https://myhost.mydomain.com or if the server has a subdirectories structure https://myhost.mydomain.com/drivers. The drivers must be hosted with the following structure:
/${driver_version}/${arch}/falco_${target}_${kernelrelease}_${kernelversion}.[ko|o]
where ko and o stand for Kernel module and eBPF probe respectively. This is an example:
/7.0.0+driver/x86_64/falco_amazonlinux2022_5.10.75-82.359.amzn2022.x86_64_1.ko
If you wish to print some debug info, you can use:
# If you want to use the kernel module, configure Falco for it
falcoctl driver printenv
You are finally ready to run the Falco binary!
Enable Falco on Systemd manually
If you installed Falco using the official packages skipping the dialog configuration, or you just downloaded the Falco binary, you might still want to enable the daemon to automatically start every time the server starts.
To do so, you can use the .service file units located under /lib/systemd/system. If your system doesn't have those files, in case of downloading the binary package, for instance, you can still download them from the Falco repo and place them on that directory.
Verify the unit files are available:
$ sudo systemctl list-unit-files "falco*"

UNIT FILE                        STATE    VENDOR PRESET
falco-bpf.service                disabled enabled
falco-custom.service             disabled enabled
falco-kmod-inject.service        static   enabled
falco-kmod.service               disabled enabled
falco-modern-bpf.service         disabled enabled
falcoctl-artifact-follow.service disabled enabled
Using the systemctl command, you can now enable the desired unit to start at boot time.
Let's say you want to enable the modern eBPF probe:
$ sudo systemctl enable falco-modern-bpf.service
Created symlink /etc/systemd/system/multi-user.target.wants/falco-modern-bpf.service → /lib/systemd/system/falco-modern-bpf.service.

$ sudo systemctl list-unit-files "falco*"

UNIT FILE                        STATE    VENDOR PRESET
falco-bpf.service                disabled enabled
falco-custom.service             disabled enabled
falco-kmod-inject.service        static   enabled
falco-kmod.service               disabled enabled
falco-modern-bpf.service         enabled  enabled
falcoctl-artifact-follow.service disabled enabled
Or you'd like to switch to using the kernel module:
$ sudo systemctl disable falco-modern-bpf.service
Removed /etc/systemd/system/multi-user.target.wants/falco-modern-bpf.service.

$ sudo systemctl enable falco-kmod.service
Created symlink /etc/systemd/system/falco.service → /lib/systemd/system/falco-kmod.service.
Created symlink /etc/systemd/system/multi-user.target.wants/falco-kmod.service → /lib/systemd/system/falco-kmod.service.

$ sudo systemctl list-unit-files "falco*"

UNIT FILE                        STATE    VENDOR PRESET
falco-bpf.service                disabled enabled
falco-custom.service             disabled enabled
falco-kmod-inject.service        static   enabled
falco-kmod.service               enabled  enabled
falco-modern-bpf.service         disabled enabled
falco.service                    enabled  enabled
falcoctl-artifact-follow.service disabled enabled

7 unit files listed.
Be aware that enabling the falco-kmod.service also creates a new alias/service called falco.service for compatibility reasons.
As a side note, if you preferred not to use the falcoctl tool to automatically update your rules, you can mask it as follows. Otherwise, as explained here, Falco will enable it too.
$ sudo systemctl mask falcoctl-artifact-follow.service
Created symlink /etc/systemd/system/falcoctl-artifact-follow.service → /dev/null.
Package signing
Most Falco packages available at download.falco.org are provided with a detached signature that can be used to verify that the package information downloaded from the remote repository can be trusted.
The latest trusted public GPG key used for packages signing can be downloaded from falco.org/repo/falcosecurity-packages.asc. The following table lists all the keys employed by the organization currently and in the past, including the revoked ones. We recommend updating the revoked keys to download their revocation certificate, and eventually removing them from your package verification system due to the signature made with them not being trustable anymore.
| Fingerprint | Expiration | Usage | Status | Download |
|---|---|---|---|---|
2005399002D5E8FF59F28CE64021833E14CB7A8D | 2026-01-17 | Signing Falco Packages | Trusted | falcosecurity-14CB7A8D.asc |
15ED05F191E40D74BA47109F9F76B25B3672BA8F | 2023-02-24 | Signing Falco Packages | Revoked | falcosecurity-3672BA8F.asc |
Container image signing
All official container images for Falco, starting from version 0.35.0, are signed with cosign. To verify the signature you can run the following command:
FALCO_VERSION=x.y.z # the version you want to verify
cosign verify docker.io/falcosecurity/falco:$FALCO_VERSION --certificate-oidc-issuer=https://token.actions.githubusercontent.com --certificate-identity-regexp=https://github.com/falcosecurity/falco/ --certificate-github-workflow-ref=refs/tags/$FALCO_VERSION
Replace docker.io/falcosecurity/falco with any official Falco image (falco, falco-no-driver, falco-driver-loader) from any official container registry to verify other images.
If you have your own container registry and wish to retain the signature while copying Falco images you can simply use the cosign copy command:
cosign copy docker.io/falcosecurity/falco:0.35.0 your-registry/falco:0.35.0
And you'll be able to easily verify that the image in your registry was not tampered with!
Troubleshooting
This section aims to offer further guidance when something doesn't go as expected in the installation of Falco.
Driver issues
ERROR failed: unable to find a prebuilt driver
This error message appears when the falcoctl driver loader tool, which looks for the Falco driver and loads it in memory, is not able to find a pre-built driver, neither as an eBPF probe nor as a kernel module, at the [Falco driver repository] (https://download.falco.org).
You can easily browse and search the supported targets at download.falco.org/driver/site.
This means that there's no prebuilt driver available for the kernel running on the machine where Falco is going to be installed.
However, you can add your kernel release version to the build grid the pipeline refers to building the drivers. Follow this tutorial to contribute the required configuration.
Was this page helpful?
Let us know! You feedback will help us to improve the content and to stay in touch with our users.
Glad to hear it! Please tell us how we can improve.
Sorry to hear that. Please tell us how we can improve.
