
Detect Malicious Behaviour on Kubernetes API Server through gathering Audit Logs by using FluentBit - Part 2
Introduction
In the previous blog post, we had talked about the Audit Logs in more detail, this post is a continuation of the previous blog post, so I suggest you take a look at the previous blog post before continuing reading. The only difference in this blog post is that this time we will use Log Backend mode, which is one of the Audit Backends that kube-apiserver supports, then we will use some kind of log collector project which is FluentBit in this case to gather these audit logs and forward them to some HTTP endpoint. You might be thinking why this kind of architecture can be more useful, the answer is that in the previous blog post we used Webhook Backend mode, so we could send the audit logs to one location only. But with using Log Backend mode and FluentBit, we are now able to send audit logs to different locations, so we are now more flexible in this regard.
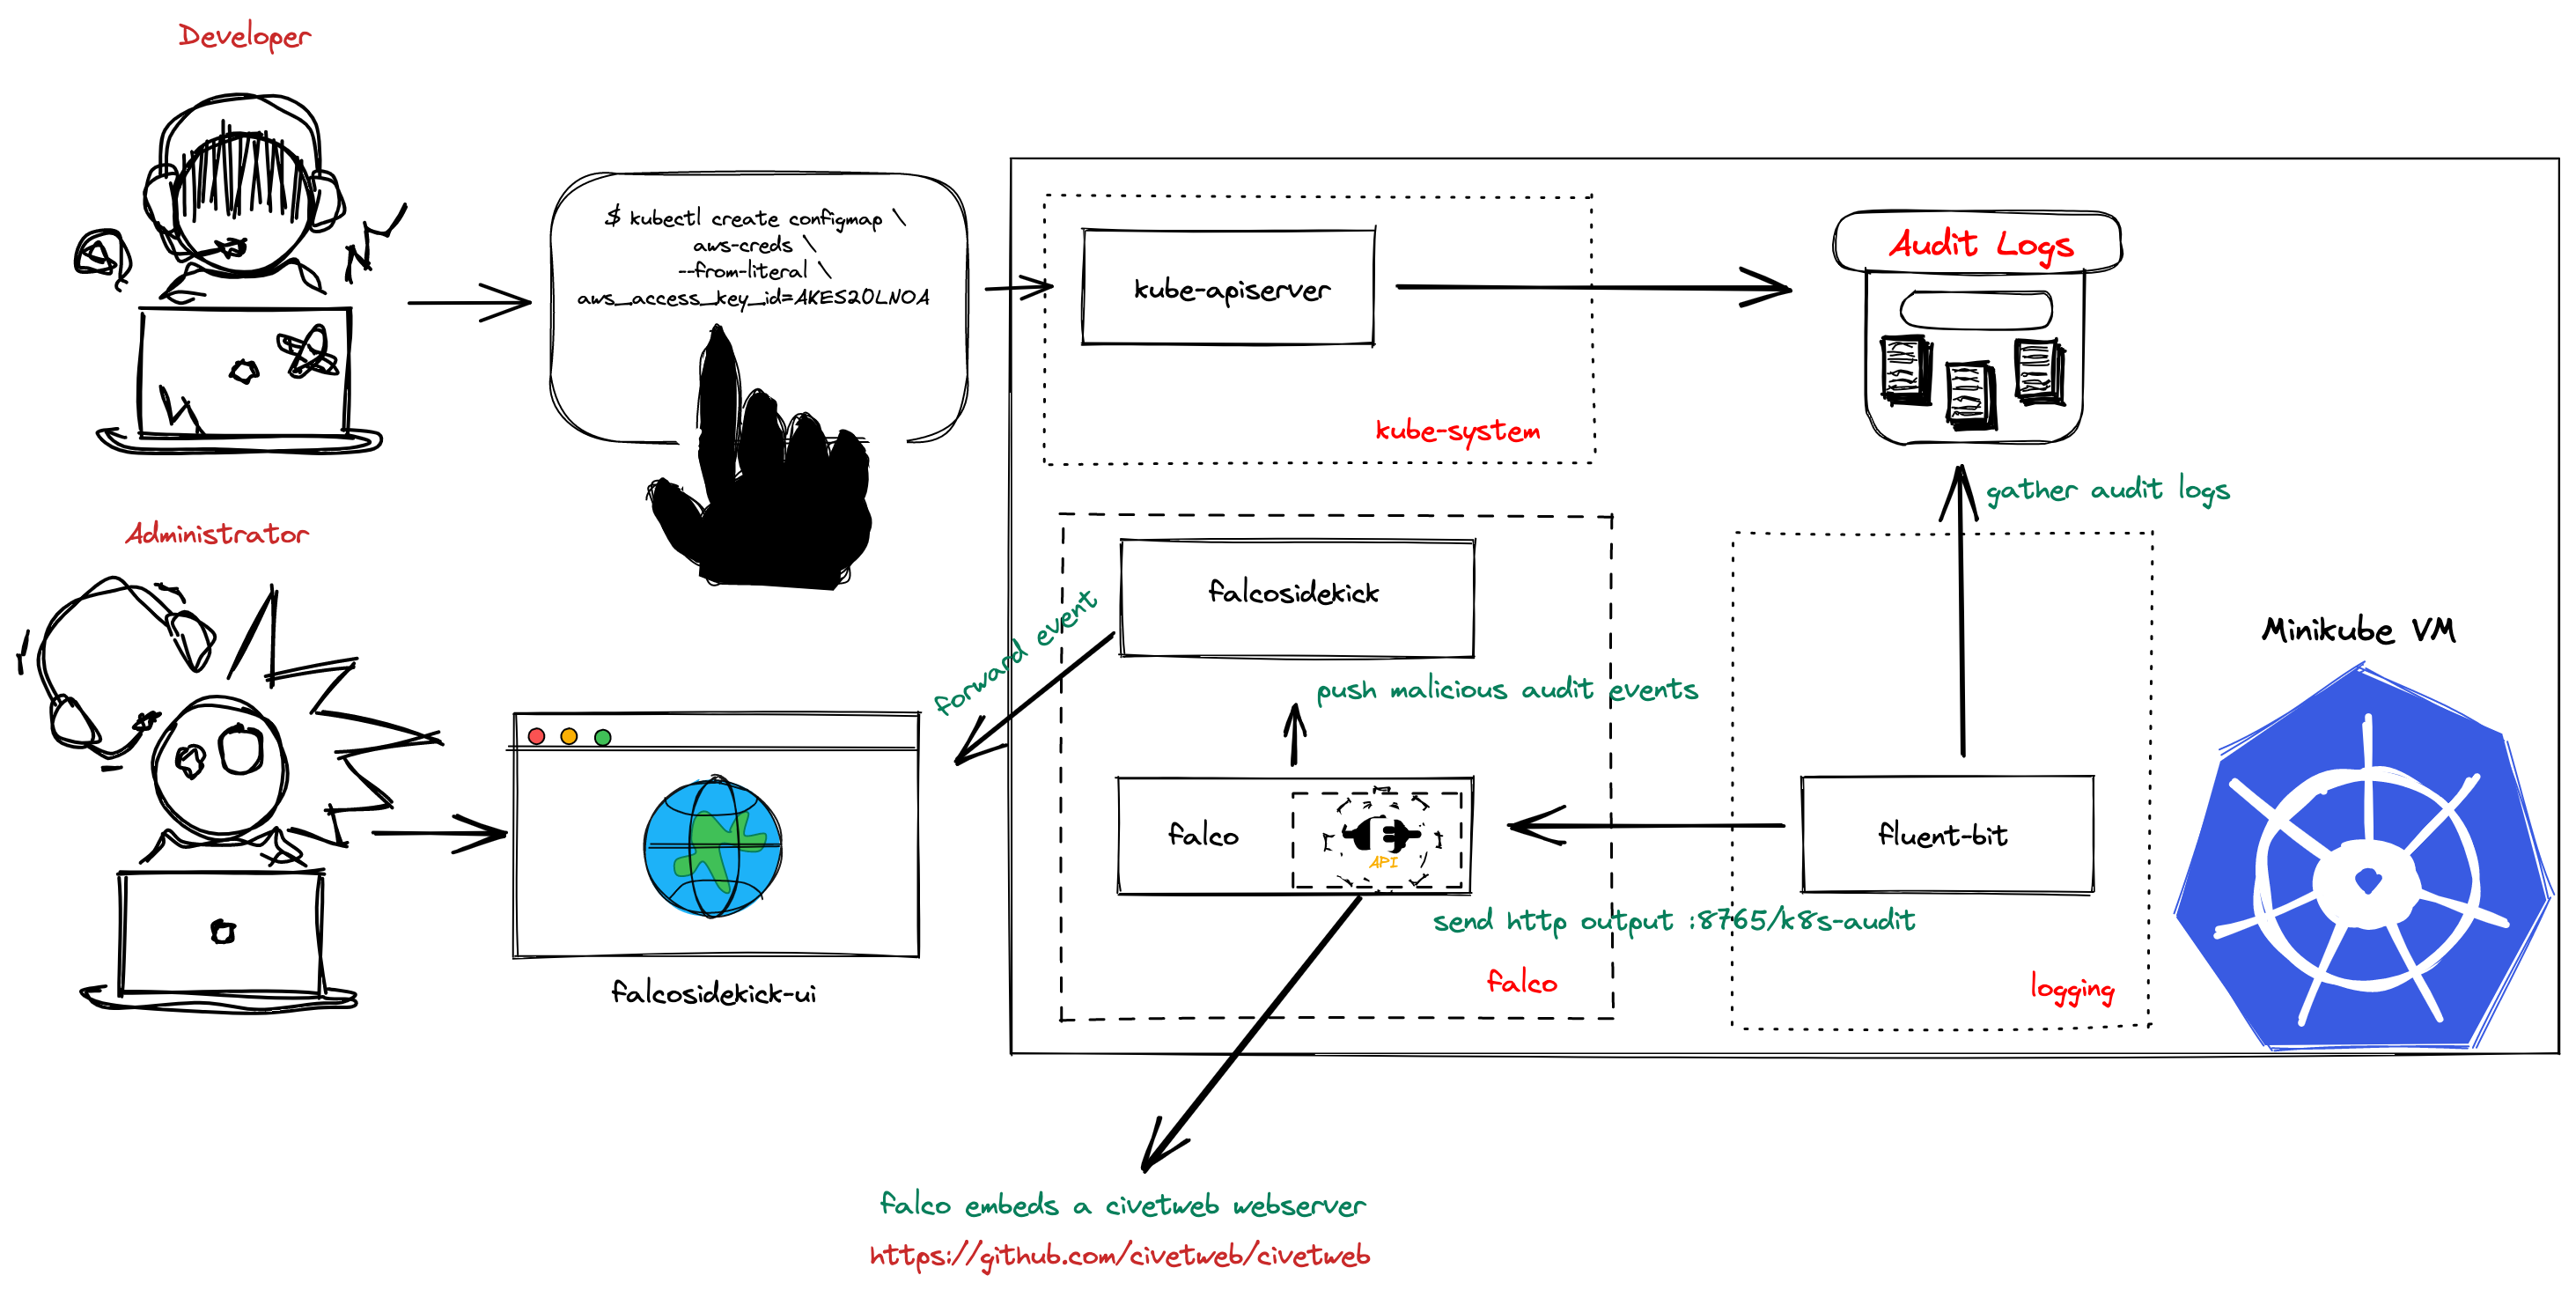
Here is the high-level overview architecture that shows what we want to achieve at the end of the day:
Prerequisites
We need tools with the following minimum versions to achieve this demo:
minikubev1.22.0kubectlv1.21.2helmv3.6.2+gee407bd
Tutorial
Provision local Kubernetes Cluster
There are various ways to provision a local Kubernetes cluster such as KinD, k3s, k0s, Minikube etc. We are going to use Minikube this time in this walkthrough.
There is a detailed guide about configuring Audit Logging in minikube, if you want to learn more about it, please see.
Let's get provision a local Kubernetes cluster:
$ minikube config view
- cpus: 3
- driver: virtualbox
- memory: 8192

$ minikube start
😄  minikube v1.22.0 on Darwin 10.15.7
✨  Using the virtualbox driver based on existing profile
👍  Starting control plane node minikube in cluster minikube
🔄  Restarting existing virtualbox VM for "minikube" ...
🐳  Preparing Kubernetes v1.21.2 on Docker 20.10.6 ...
🔎  Verifying Kubernetes components...
    ▪ Using image gcr.io/k8s-minikube/storage-provisioner:v5
🌟  Enabled addons: storage-provisioner
🏄  Done! kubectl is now configured to use "minikube" cluster and "default" namespace by default
Enable Kubernetes Audit Logging
Let's connect to the Minikube instance, which runs in VM, and download the Audit Policy file. This file is kind of a filter to decide what should be in the Audit Logs. This Audit Log file can grow very quickly and cause some performance issues if we didn't filter anything.
This is not the recommended Audit Policy file, this is just an example, it would be better to prepare your Audit Policy file that is suitable for your needs.
$ minikube ssh
            _         _ ( )           ( )
  ___ ___  (_)  ___  (_)| |/')  _   _ | |_      __
/' _ ` _ `\| |/' _ `\| || , <  ( ) ( )| '_`\  /'__`\
| ( ) ( ) || || ( ) || || |\`\ | (_) || |_) )(  ___/
(_) (_) (_)(_)(_) (_)(_)(_) (_)`\___/'(_,__/'`\____)
$ sudo mkdir -p /etc/kubernetes/audit
$ sudo curl -sLo /etc/kubernetes/audit/audit-policy.yaml \
       https://raw.githubusercontent.com/kubernetes/website/main/content/en/examples/audit/audit-policy.yaml
Let's edit the kube-apiserver, which is deployed as static Pod with the necessary flags and volumes to enable the Audit Logging.
$ sudo vi /etc/kubernetes/manifests/kube-apiserver.yaml
# Update Result
spec.containers.kube-apiserver.command
  + two list entries added:
    - --audit-policy-file=/etc/kubernetes/audit/audit-policy.yaml
    - --audit-log-path=/var/log/kubernetes/kube-apiserver-audit.log

spec.containers.kube-apiserver.volumeMounts
  + two list entries added:
    - name: audit-log
    │ mountPath: /var/log/kubernetes/kube-apiserver-audit.log
    │ readOnly: false
    - name: audit-policy
    │ mountPath: /etc/kubernetes/audit/audit-policy.yaml
    │ readOnly: true

spec.volumes
  + two list entries added:
    - name: audit-log
    │ hostPath:
    │ │ type: FileOrCreate
    │ │ path: /var/log/kubernetes/kube-apiserver-audit.log
    - name: audit-policy
    │ hostPath:
    │ │ type: File
    │ │ path: /etc/kubernetes/audit/audit-policy.yaml
Once you updated the manifest file, the kube-apiserver can't be reachable for a while, so please keep trying until the kube-apiserver becoming healthy.
The audit log file should be generated when the kube-apiserver becomes healthy, so please be sure about this before moving into the next phase.
$ minikube ssh
            _         _ ( )           ( )
  ___ ___  (_)  ___  (_)| |/')  _   _ | |_      __
/' _ ` _ `\| |/' _ `\| || , <  ( ) ( )| '_`\  /'__`\
| ( ) ( ) || || ( ) || || |\`\ | (_) || |_) )(  ___/
(_) (_) (_)(_)(_) (_)(_)(_) (_)`\___/'(_,__/'`\____)
$  ls -latr /var/log/kubernetes/
total 4868
drwxr-xr-x 6 root root    4096 Jul 21 17:37 ..
drwxr-xr-x 2 root root    4096 Jul 21 17:37 .
-rw-r--r-- 1 root root 4973184 Jul 21 18:39 kube-apiserver-audit.log
Install Falco and Falcosidekick with Auditing Feature Enabled
We'll use Helm to install the Falco, so there is an option that we can enable or disable the audit log feature called auditLog.enabled, once we set the value of the option as true, the embedded webserver will be started within the Falco to consume audit events from the port 8765 and behind k8s-audit endpoint.
Firstly, we'll create the namespace that will host both Falco and Falcosidekick:
$ kubectl create namespace falco
namespace/falco created
We add the helm repo:
$ helm repo add falcosecurity https://falcosecurity.github.io/charts
"falcosecurity" has been added to your repositories
$ helm repo update
Hang tight while we grab the latest from your chart repositories...
...Successfully got an update from the "falcosecurity" chart repository
In a real project, you should get the whole chart with helm pull falcosecurity/falco --untar and then configure
the values.yaml. For this tutorial, will try to keep thing as easy as possible and set configs directly
by passing arguments to helm install command line:
$ helm upgrade --install falco falcosecurity/falco --namespace falco \
--set falcosidekick.enabled=true \
--set falcosidekick.webui.enabled=true \
--set auditLog.enabled=true
You should get this output:
Release "falco" does not exist. Installing it now.
NAME: falco
LAST DEPLOYED: Tue Apr 13 10:49:49 2021
NAMESPACE: falco
STATUS: deployed
REVISION: 1
NOTES:
Falco agents are spinning up on each node in your cluster. After a few
seconds, they are going to start monitoring your containers looking for
security issues.


No further action should be required.
And you can see your new Falco and Falcosidekick pods:
$ kubectl get pods --namespace falco
NAME                                      READY   STATUS    RESTARTS   AGE
falco-falcosidekick-76f5885f7f-956vj      1/1     Running   0          4m27s
falco-falcosidekick-76f5885f7f-tmff6      1/1     Running   0          4m27s
falco-falcosidekick-ui-5b64749bc8-k8v4p   1/1     Running   0          4m27s
falco-h4qvx                               1/1     Running   0          4m27s
Check your services within the namespace falco, and you should see that Falco service has 8765 port, let's verify that.
$ kubectl get services --namespace falco
NAME                     TYPE        CLUSTER-IP      EXTERNAL-IP   PORT(S)    AGE
falco                    ClusterIP   10.96.156.167   <none>        8765/TCP   4m40s
falco-falcosidekick      ClusterIP   10.105.37.184   <none>        2801/TCP   4m40s
falco-falcosidekick-ui   ClusterIP   10.111.57.54    <none>        2802/TCP   4m40s
The argument falcosidekick.enabled=true sets the following settings in Falco for you:
--set falco.jsonOutput=true \
--set falco.httpOutput.enabled=true \
--set falco.httpOutput.url=http://falco-falcosidekick:2801
The arguments --set falco.jsonOutput=true --set falco.httpOutput.enabled=true --set falco.httpOutput.url=http://falco-falcosidekick:2801 are there to configure the format of events and the URL where Falco will send them. As Falco and Falcosidekick will be in the same namespace, it can directly use the name of the service (falco-falcosidekick) above Falcosidekick pods.
We check the logs:
$ kubectl logs deployment/falco-falcosidekick --namespace falco
Found 2 pods, using pod/falco-falcosidekick-76f5885f7f-tmff6
2021/05/22 15:46:58 [INFO]  : Enabled Outputs : [WebUI]
2021/05/22 15:46:58 [INFO]  : Falco Sidekick is up and listening on :2801
WebUI is displayed as enabled output, everything is good 👍.
Deploy FluentBit
In order to deploy FluentBit, we're going to use its Helm chart with our own configurations.
If you want to get more detail about the Helm chart of the FluentBit, please see.
$ cat << EOF | tee values-override.yaml
config:
  inputs: |
   [INPUT]
       Name              tail
       Alias             kube_audit
       Tag               kube_audit
       Buffer_Chunk_Size 512k
       Buffer_Max_Size   5m
       Path              /var/log/kubernetes/kube-apiserver-audit.log
       Parser            json
       DB                /var/log/kube_audit_log.db
       Mem_Buf_Limit     128MB
       Skip_Long_Lines   On
       Refresh_Interval  10

  outputs: |
    [OUTPUT]
        Name            http
        Alias           kube_audit_to_falco
        Match           kube_audit
        Host            falco.falco
        Port            8765
        URI             /k8s-audit
        Format          json
EOF

$ kubectl create namespace logging
namespace/logging created

$ helm upgrade --install fluent-bit fluent/fluent-bit \
        -f values-override.yaml \
        -n logging
Release "fluent-bit" has been upgraded. Happy Helming!
NAME: fluent-bit
LAST DEPLOYED: Wed Jul 21 22:59:25 2021
NAMESPACE: logging
STATUS: deployed
REVISION: 1
NOTES:
Get Fluent Bit build information by running these commands:

export POD_NAME=$(kubectl get pods --namespace logging -l "app.kubernetes.io/name=fluent-bit,app.kubernetes.io/instance=fluent-bit" -o jsonpath="{.items[0].metadata.name}")
echo "curl http://127.0.0.1:2020 for Fluent Bit build information"
kubectl --namespace logging port-forward $POD_NAME 2020:2020
Now we are ready to test everything.
Test
There is a rule called Create/Modify Configmap With Private Credentials in Falco for detecting ConfigMaps that contains private credentials from Kubernetes Audit Logs. You can see the details of the rule from this link. To test this, we should create a ConfigMap that contains private credentials.
First, use kubectl port-forward to access the Falco Sidekick UI:
$ kubectl --namespace=falco port-forward svc/falco-falcosidekick-ui 2802
Forwarding from 127.0.0.1:2802 -> 2802
Forwarding from [::1]:2802 -> 2802
Open http://localhost:2802/ui/ to load the UI (omitting the /ui/ portion of the URL will result in an error)
Now, let's create the ConfigMap.
$ kubectl create configmap aws-creds \
  --from-literal aws_access_key_id=AKES20LNOA
configmap/aws-creds created
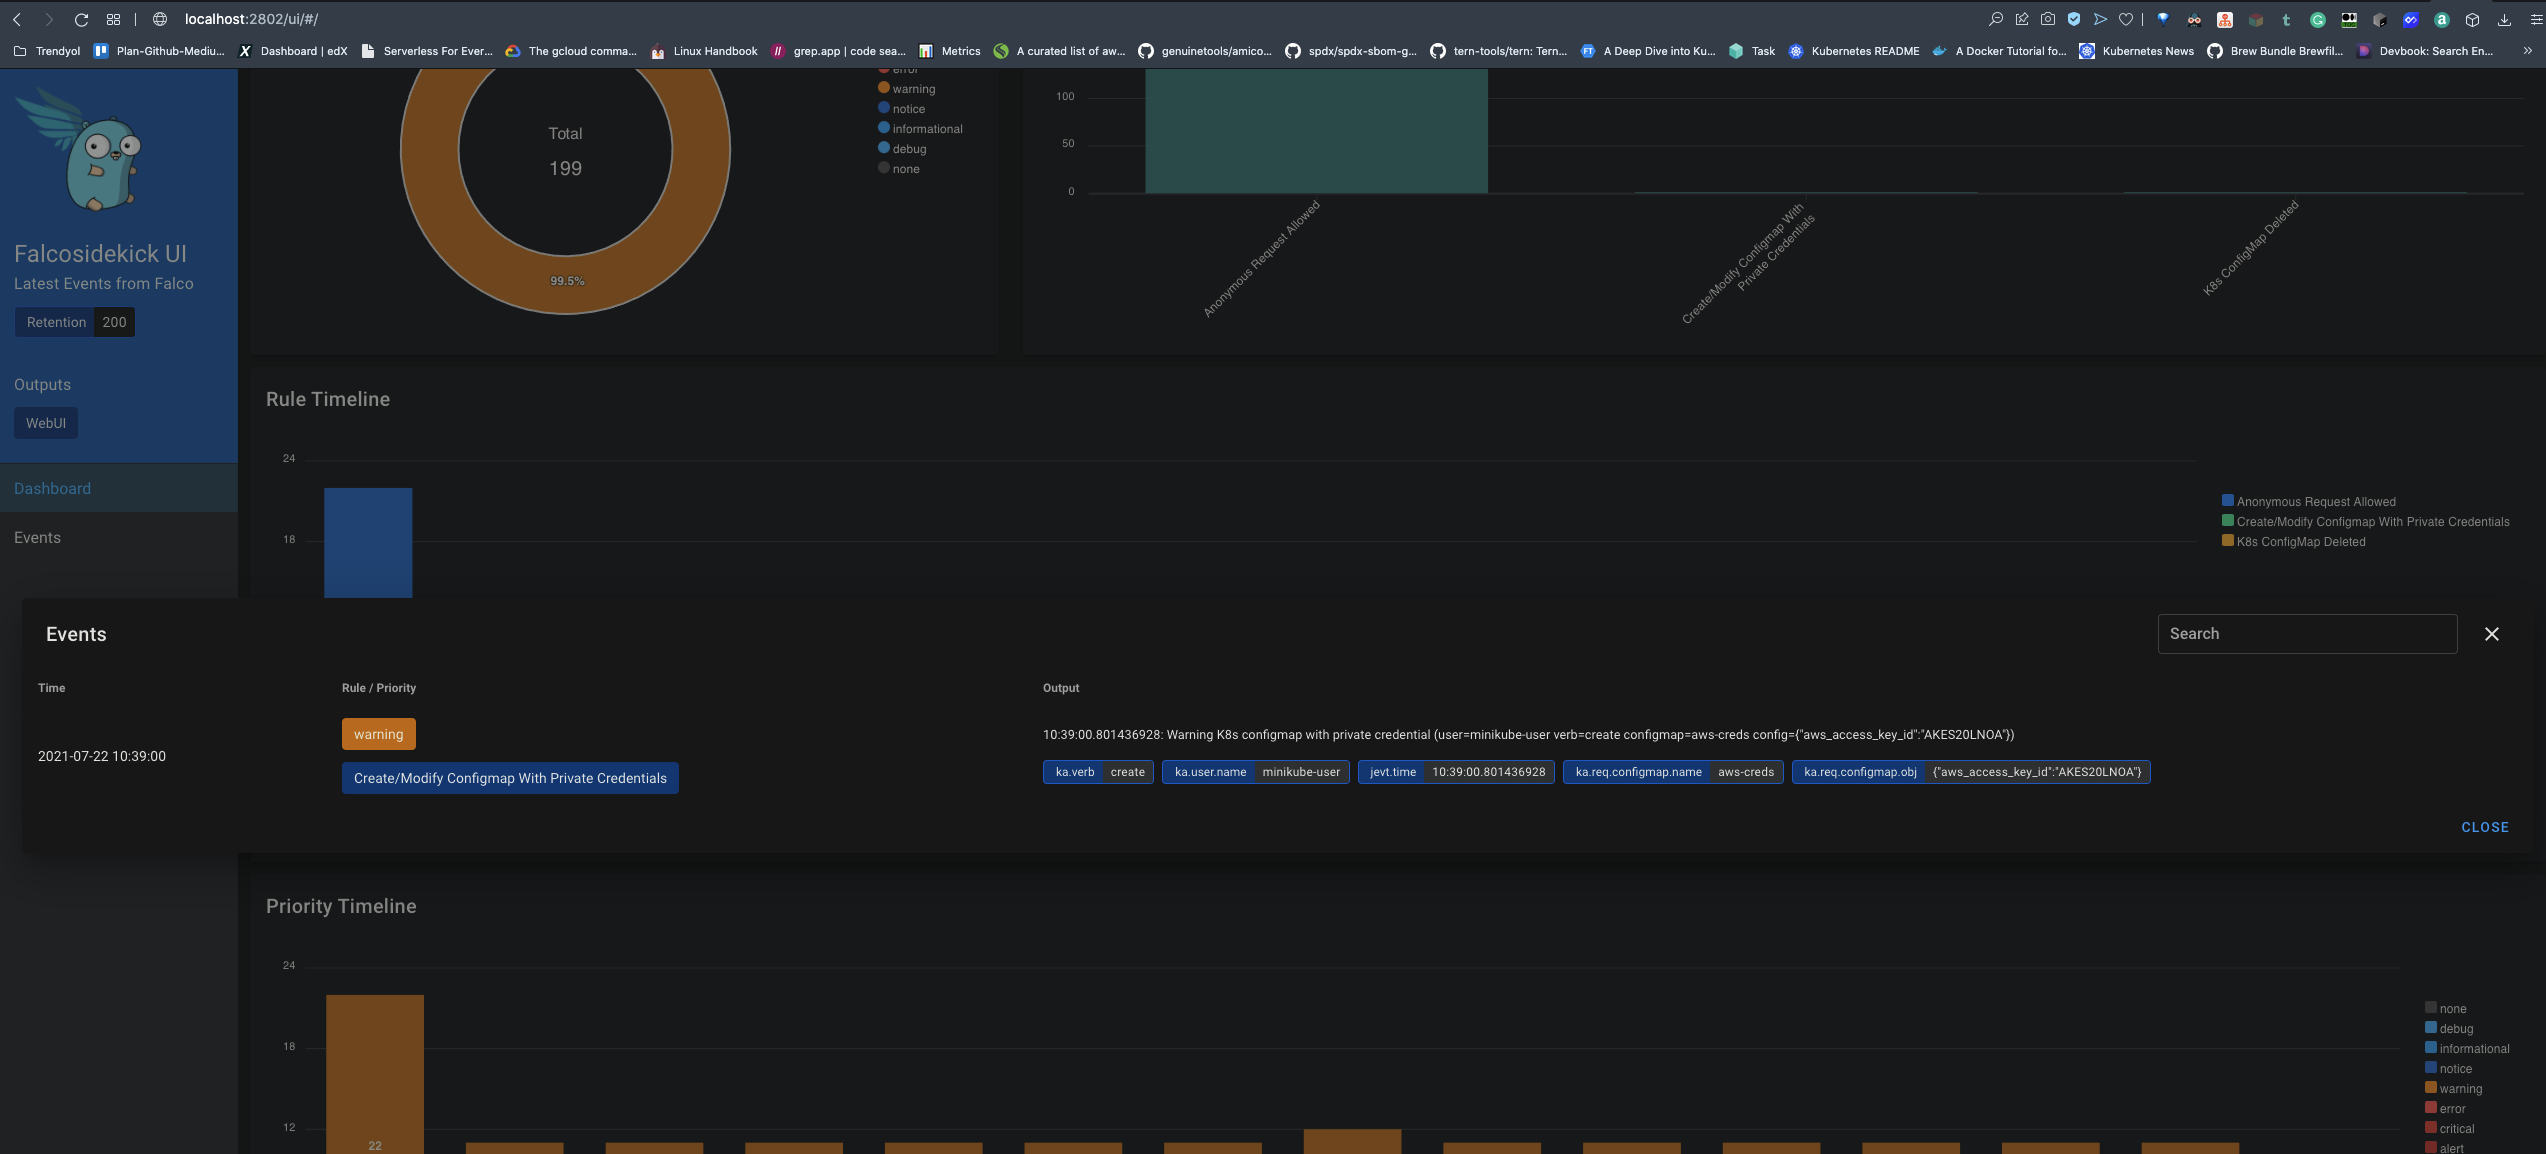
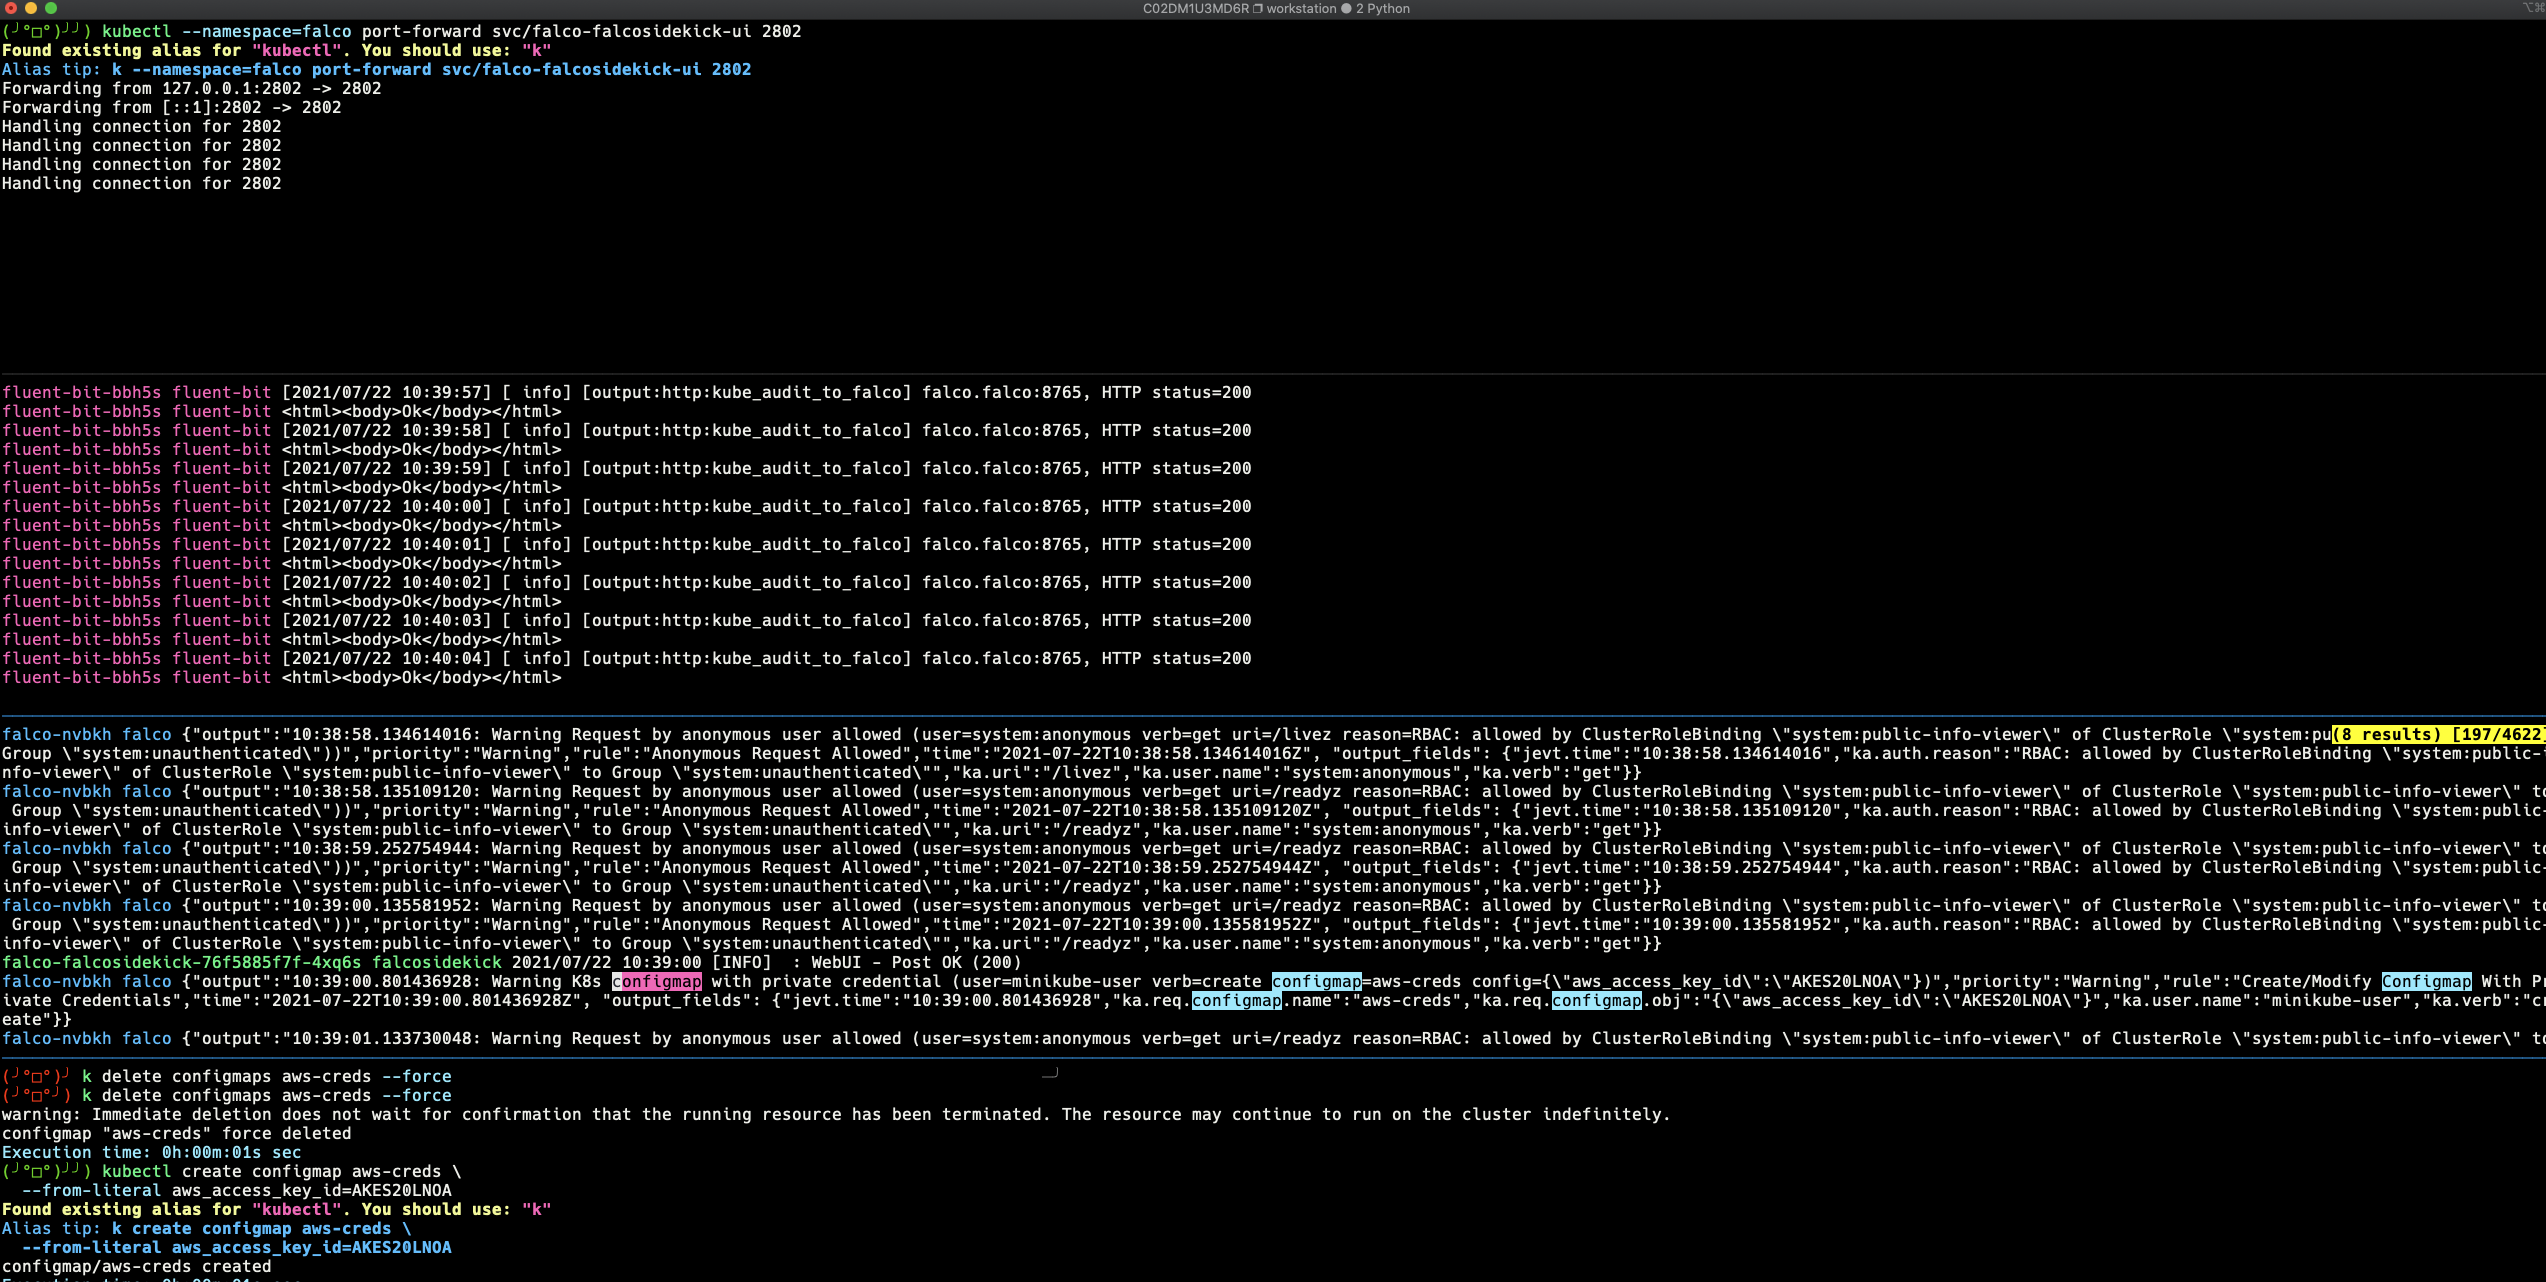
As soon as you created the ConfigMap, the Audit Log will be generated, then FluentBit will gather the audit log and send it to Falco. In turn, Falco will detect the malicious behavior from the audit logs and send an alert to the Falcosidekick. Finally, Falcosidekick forwards the alert to the Web UI. So, you should see similar screens like the following:
Conclusion
With this really simple example, we only want to show how FluentBit can be useful for us to implement this kind of architecture.
If you would like to find out more about Falco:
- Get started in Falco.org.
- Check out the Falco project in GitHub.
- Get involved in the Falco community.
- Meet the maintainers on the Falco Slack.
- Follow @falco_org on Twitter.
