
Detect Malicious Behaviour on Kubernetes API Server through Audit Logs
Introduction
We might not know that Falco is not just for detecting malicious behavior that involves making Linux system calls, in addition to that, Falco v0.13.0 adds Kubernetes Audit Events to the list of supported event sources. That means that, once your cluster is configured with audit log enabled, you can send audit logs as events to Falco, then, you can write Falco rules that can read these events and detect malicious or other notable activity. After that, you can send notifications about the malicious activities or set up a Kubernetes Response Engine to take any action based on them. If you want to take a look at the rules which Falco provides for Kubernetes Audit logs, you can refer to this link. Also, if you want to learn more about that Kubernetes Response Engine is, there is series of articles about how to create a Kubernetes response engine with Falco, Falcosidekick and a FaaS.
- Kubernetes Response Engine, Part 1 : Falcosidekick + Kubeless
- Kubernetes Response Engine, Part 2 : Falcosidekick + OpenFaas
- Kubernetes Response Engine, Part 3 : Falcosidekick + Knative
- Kubernetes Response Engine, Part 4: Falcosidekick + Tekton
- Kubernetes Response Engine, Part 5: Falcosidekick + Argo
Without further ado, let's explain what Audit Logs are, and which useful pieces of information that they have for us.
We can assume that Kubernetes API Server is like the brain of the cluster. We all communicate with the cluster through Kubernetes API Server, which means that all the requests hit Kubernetes API Server first. So, sometimes we might want to know that what’s happening inside of that brain. At this point, the Kubernetes Audit Log comes into the picture.
Kubernetes Audit Logs are the records that explain what’s happening inside of this brain but if we look at them more technically the official documentation says Kubernetes Audit logs provide a security-relevant, chronological set of records documenting the sequence of actions in a cluster., so by collecting and analyzing them we can answer these following questions:
- What happened?
- When did it happen?
- Who initiated it?
- On what did it happen?
To get more detail about them, you can refer to this link.
In this guide, I'll explain the following topics:
- How you can enable Audit log feature in Kubernetes.
- How you can enable the embedded web server available within the Falco project.
- The purpose of the Falcosidekick project.
Prerequisites
We need tools with the following minimum versions to achieve this demo:
- multipass v1.6.2
- k3sup v0.11.0
- kubectl v1.21.1
- helm v3.5.4+g1b5edb6
Tutorial
Provision local Kubernetes Cluster
There are various ways to provision a local Kubernetes cluster such as, KinD, k3s, k0s, Minikube etc. We are going to use k3s in this walkthrough, we're also going to use some tooling to make the installation process of k3s cluster easier and quicker such as k3sup and multipass.
Let's get provision a local Kubernetes cluster:
# Create a ssh key for the instance
$ ssh-keygen -t rsa -b 4096 -C "test@test.com"
Generating public/private rsa key pair.
Enter file in which to save the key (/Users/batuhan.apaydin/.ssh/id_rsa): k3s_rsa
Enter passphrase (empty for no passphrase):
Enter same passphrase again:
Your identification has been saved in k3s_rsa.
Your public key has been saved in k3s_rsa.pub.
The key fingerprint is:
SHA256:Ohpm8fRg3E4Gtl6kcVKHPPaeZkx9Zt6KRgrjc4ToGP0 test@test.com
The key's randomart image is:
+---[RSA 4096]----+
|       ....      |
|       .=.       |
|      =.oo .     |
|     o X  o . +  |
|    ..B.S= . = . |
|    .*oO+ B . . .|
|    ++=oo* o . . |
|   o.o..E o o .  |
|    .    o .     |
+----[SHA256]-----+

$ ls -latr
total 16
drwxr-xr-x  112 batuhan.apaydin  staff  3584 May 22 18:22 ..
-rw-------    1 batuhan.apaydin  staff  3381 May 22 18:24 k3s_rsa
drwxr-xr-x    4 batuhan.apaydin  staff   128 May 22 18:24 .
-rw-r--r--    1 batuhan.apaydin  staff   739 May 22 18:24 k3s_rsa.pub

# Create a file called cloud-init.yaml, this file makes sure the public key is stored on the virtual machine once it’s created
$ cat << EOF | tee cloud-init.yaml
ssh_authorized_keys:
  - ssh-rsa AAAAB3NzaC1yc2EAAAADAQABAAACAQC/qWh+VU1nAm3dTPOiEbCSsW841TAE0IT9bDBWPHJ62a90QVQCdrwl0VVIu6RreH2CpCqjdyWzJ/ZZ9KiUU2lkCGlLfo1ExEu3QqlTrjSgRY4BQSaXTJsJmSWojgtiXijObiadUfQsagdG2ZZD78c6T0lKrg1bCyjedJC9xx4MKVGhRvCw4IcJ+RAyZzTSF6XbqG0FDgCYLtKRbPZpy4KWtENXvWAmdKZbeiyO9RjUkPmWjK0Kk1YAekYTjFxia+KJE3Vx6gIhRH+no7PeizkSyKG6cMXE4DyW2OkIQzfb82K2MWS2jORiIFpU1/FtFytu6Enpj1OE8j1vJLjrzcKHH7HEHvSzWtpIZ6H3dYFxavaBcmgsZJX7fXfm8nguI87NQ0F1JFzSIibz2F0ICybN9rQShPc0cHizZHV/lWRlBV1qUvaY1c7O6CTnRdOVXqSj+a9c6C5SEEe/+Ml2Sqnmyrg6c0k1IxMXR2yDDSgWBzzTPdR4E8OSzD7W2FpzMmYR+9SREPYyY9cOO/Lw8zKdhLnHG1YKmzuX2h4sJN2xtmjMSKvSKJCuSInzZjn6HVZF4FRIouI7I0LLv4rASOLpTmAFF2PqNxhB8bGCwYHnJXhzQCONyG8eTOCraaheNJOnhSjfSVSZyCPDYNrp7KdBkU6tqvDzHFJ6MNuJYTI94Q== test@test.com
EOF

# Create an instance named k3s-leader with the given details
$ multipass launch --name k3s-leader --cpus 2 --mem 2048M --disk 10G --cloud-init cloud-init.yaml
Launched: k3s-leader

# Get the IP address of the server
$ export K3S_IP_SERVER="$(multipass info k3s-leader | grep "IPv4" | awk -F' ' '{print $2}')"
$ echo $K3S_IP_SERVER
https://192.168.64.26:6443

# Set up k3s on server by using k3sup
$ k3sup install --ip $K3S_IP_SERVER --user ubuntu --k3s-extra-args "--cluster-init" --ssh-key k3s_rsa
Running: k3sup install
2021/05/22 18:32:51 192.168.64.26
Public IP: 192.168.64.26
[INFO]  Finding release for channel v1.19
[INFO]  Using v1.19.11+k3s1 as release
[INFO]  Downloading hash https://github.com/k3s-io/k3s/releases/download/v1.19.11+k3s1/sha256sum-amd64.txt
[INFO]  Downloading binary https://github.com/k3s-io/k3s/releases/download/v1.19.11+k3s1/k3s
[INFO]  Verifying binary download
[INFO]  Installing k3s to /usr/local/bin/k3s
[INFO]  Creating /usr/local/bin/kubectl symlink to k3s
[INFO]  Creating /usr/local/bin/crictl symlink to k3s
[INFO]  Creating /usr/local/bin/ctr symlink to k3s
[INFO]  Creating killall script /usr/local/bin/k3s-killall.sh
[INFO]  Creating uninstall script /usr/local/bin/k3s-uninstall.sh
[INFO]  env: Creating environment file /etc/systemd/system/k3s.service.env
[INFO]  systemd: Creating service file /etc/systemd/system/k3s.service
[INFO]  systemd: Enabling k3s unit
Created symlink /etc/systemd/system/multi-user.target.wants/k3s.service → /etc/systemd/system/k3s.service.
[INFO]  systemd: Starting k3s
Result: [INFO]  Finding release for channel v1.19
[INFO]  Using v1.19.11+k3s1 as release
[INFO]  Downloading hash https://github.com/k3s-io/k3s/releases/download/v1.19.11+k3s1/sha256sum-amd64.txt
[INFO]  Downloading binary https://github.com/k3s-io/k3s/releases/download/v1.19.11+k3s1/k3s
[INFO]  Verifying binary download
[INFO]  Installing k3s to /usr/local/bin/k3s
[INFO]  Creating /usr/local/bin/kubectl symlink to k3s
[INFO]  Creating /usr/local/bin/crictl symlink to k3s
[INFO]  Creating /usr/local/bin/ctr symlink to k3s
[INFO]  Creating killall script /usr/local/bin/k3s-killall.sh
[INFO]  Creating uninstall script /usr/local/bin/k3s-uninstall.sh
[INFO]  env: Creating environment file /etc/systemd/system/k3s.service.env
[INFO]  systemd: Creating service file /etc/systemd/system/k3s.service
[INFO]  systemd: Enabling k3s unit
[INFO]  systemd: Starting k3s
Created symlink /etc/systemd/system/multi-user.target.wants/k3s.service → /etc/systemd/system/k3s.service.

Saving file to: /Users/batuhan.apaydin/workspace/projects/personal/poc/audit-log-falco-k3s/kubeconfig

# Test your cluster with:
export KUBECONFIG=/Users/batuhan.apaydin/workspace/projects/personal/poc/audit-log-falco-k3s/kubeconfig
kubectl config set-context default
kubectl get node -o wide

# Set KUBECONFIG environment variable to work with kubectl
$ export KUBECONFIG=/Users/batuhan.apaydin/workspace/projects/personal/poc/audit-log-falco-k3s/kubeconfig
Verify if everything is working before move on to the next step.
$ kubectl get nodes -o wide
NAME         STATUS   ROLES         AGE   VERSION         INTERNAL-IP     EXTERNAL-IP   OS-IMAGE             KERNEL-VERSION     CONTAINER-RUNTIME
k3s-leader   Ready    etcd,master   93s   v1.19.11+k3s1   192.168.64.26   <none>        Ubuntu 20.04.2 LTS   5.4.0-73-generic   containerd://1.4.4-k3s1
Install Falco and Falcosidekick with Auditing Feature Enabled
We'll use Helm to install the Falco, so, there is an option that we can enable or disable the audit log feature called auditLog.enabled, once we set the value of the option as true, the embedded webserver will be started within the Falco to consume audit events from the port 8765 and behind k8s-audit endpoint.
Firstly, we'll create the namespace that will host both Falco and Falcosidekick:
$ kubectl create namespace falco
namespace/falco created
We add the helm repo:
$ helm repo add falcosecurity https://falcosecurity.github.io/charts
"falcosecurity" has been added to your repositories
$ helm repo update
Hang tight while we grab the latest from your chart repositories...
...Successfully got an update from the "falcosecurity" chart repository
In a real project, you should get the whole chart with helm pull falcosecurity/falco --untar and then configure
the values.yaml. For this tutorial, will try to keep thing as easy as possible and set configs directly
by passing arguments to helm install command line:
$ helm upgrade --install falco falcosecurity/falco --namespace falco \
--set falcosidekick.enabled=true \
--set falcosidekick.webui.enabled=true \
--set auditLog.enabled=true
You should get this output:
Release "falco" does not exist. Installing it now.
NAME: falco
LAST DEPLOYED: Tue Apr 13 10:49:49 2021
NAMESPACE: falco
STATUS: deployed
REVISION: 1
NOTES:
Falco agents are spinning up on each node in your cluster. After a few
seconds, they are going to start monitoring your containers looking for
security issues.


No further action should be required.
And you can see your new Falco and Falcosidekick pods:
$ kubectl get pods --namespace falco
NAME                                      READY   STATUS    RESTARTS   AGE
falco-2tqn8                               1/1     Running   0          10m
falco-falcosidekick-fb6f8b856-fz9nt       1/1     Running   0          10m
falco-falcosidekick-fb6f8b856-wjvzx       1/1     Running   0          10m
falco-falcosidekick-ui-7c5fc8dd54-gdkbz   1/1     Running   0          10m
Check your services within the namespace falco, and you should see that Falco service has 8765 port, let's verify that.
$ kubectl get services --namespace falco
NAME                     TYPE        CLUSTER-IP      EXTERNAL-IP   PORT(S)    AGE
falco                    ClusterIP   10.43.209.197   <none>        8765/TCP   12m # here is important.
falco-falcosidekick      ClusterIP   10.43.77.241    <none>        2801/TCP   12m
falco-falcosidekick-ui   ClusterIP   10.43.197.181   <none>        2802/TCP   12m
The argument falcosidekick.enabled=true sets the following settings in Falco for you:
--set falco.jsonOutput=true \
--set falco.httpOutput.enabled=true \
--set falco.httpOutput.url=http://falco-falcosidekick:2801
The arguments --set falco.jsonOutput=true --set falco.httpOutput.enabled=true --set falco.httpOutput.url=http://falco-falcosidekick:2801 are there to configure the format of events and the URL where Falco will send them. As Falco and Falcosidekick will be in the same namespace, it can directly use the name of the service(falco-falcosidekick) above Falcosidekick pods.
We check the logs:
$ kubectl logs deployment/falco-falcosidekick --namespace falco
Found 2 pods, using pod/falco-falcosidekick-fb6f8b856-wjvzx
2021/05/22 15:46:58 [INFO]  : Enabled Outputs : [WebUI]
2021/05/22 15:46:58 [INFO]  : Falco Sidekick is up and listening on :2801
WebUI is displayed as enabled output, everything is good 👍.
Enabling Kubernetes Audit Logs
To enable Kubernetes audit logs, you need to change the arguments to the kube-apiserver process to add --audit-policy-file and --audit-webhook-config-file arguments and provide files that implement an audit policy/webhook configuration.
Let's do that.
$ multipass shell k3s-leader
ubuntu@k3s-leader:~$ sudo mkdir -p /var/lib/rancher/audit
ubuntu@k3s-leader:~$ wget https://raw.githubusercontent.com/falcosecurity/evolution/master/examples/k8s_audit_config/audit-policy.yaml -P /var/lib/rancher/audit
ubuntu@k3s-leader:~$ FALCO_CLUSTER_IP=$(sudo  kubectl get service --namespace falco falco -o=jsonpath={.spec.clusterIP})
ubuntu@k3s-leader:~$ cat << EOF | sudo tee /var/lib/rancher/audit/webhook-config.yaml
apiVersion: v1
kind: Config
clusters:
- name: falco
  cluster:
    server: http://$FALCO_CLUSTER_IP:8765/k8s-audit
contexts:
- context:
    cluster: falco
    user: ""
  name: default-context
current-context: default-context
preferences: {}
users: []
EOF
Once you created the necessary files, we should update k3s.service Unit file.
ubuntu@k3s-leader:~$ vim /etc/systemd/system/k3s.service
# add these lines to after the k3s server command.
# --kube-apiserver-arg=audit-log-path=/var/lib/rancher/audit/audit.log
# --kube-apiserver-arg=audit-policy-file=/var/lib/rancher/audit/audit-policy.yaml
# --kube-apiserver-arg=audit-webhook-config-file=/var/lib/rancher/audit/webhook-config.yaml
The final k3s.service Unit file should looks like the following:
[Unit]
Description=Lightweight Kubernetes
Documentation=https://k3s.io
Wants=network-online.target
After=network-online.target

[Install]
WantedBy=multi-user.target

[Service]
Type=notify
EnvironmentFile=-/etc/default/%N
EnvironmentFile=-/etc/sysconfig/%N
EnvironmentFile=-/etc/systemd/system/k3s.service.env
KillMode=process
Delegate=yes
# Having non-zero Limit*s causes performance problems due to accounting overhead
# in the kernel. We recommend using cgroups to do container-local accounting.
LimitNOFILE=1048576
LimitNPROC=infinity
LimitCORE=infinity
TasksMax=infinity
TimeoutStartSec=0
Restart=always
RestartSec=5s
ExecStartPre=-/sbin/modprobe br_netfilter
ExecStartPre=-/sbin/modprobe overlay
ExecStart=/usr/local/bin/k3s \
    server \
        '--tls-san' \
        '192.168.64.26' \
        '--cluster-init' \
        '--kube-apiserver-arg=audit-log-path=/var/lib/rancher/audit/audit.log' \
        '--kube-apiserver-arg=audit-policy-file=/var/lib/rancher/audit/audit-policy.yaml' \
        '--kube-apiserver-arg=audit-webhook-config-file=/var/lib/rancher/audit/webhook-config.yaml'
Save this file and restart k3s service.
ubuntu@k3s-leader:~$ sudo systemctl daemon-reload && sudo systemctl restart k3s
Verify if everything is working before move on to the next step.
ubuntu@k3s-leader:~$ sudo systemctl status k3s.service
● k3s.service - Lightweight Kubernetes
     Loaded: loaded (/etc/systemd/system/k3s.service; enabled; vendor pres>
     Active: active (running) since Sat 2021-05-22 19:46:06 +03; 8min ago
       Docs: https://k3s.io
    Process: 15250 ExecStartPre=/sbin/modprobe br_netfilter (code=exited, >
    Process: 15251 ExecStartPre=/sbin/modprobe overlay (code=exited, statu>
   Main PID: 15252 (k3s-server)
      Tasks: 144
     Memory: 1.2G
     CGroup: /system.slice/k3s.service
...
Now we are ready to test everything.
Test
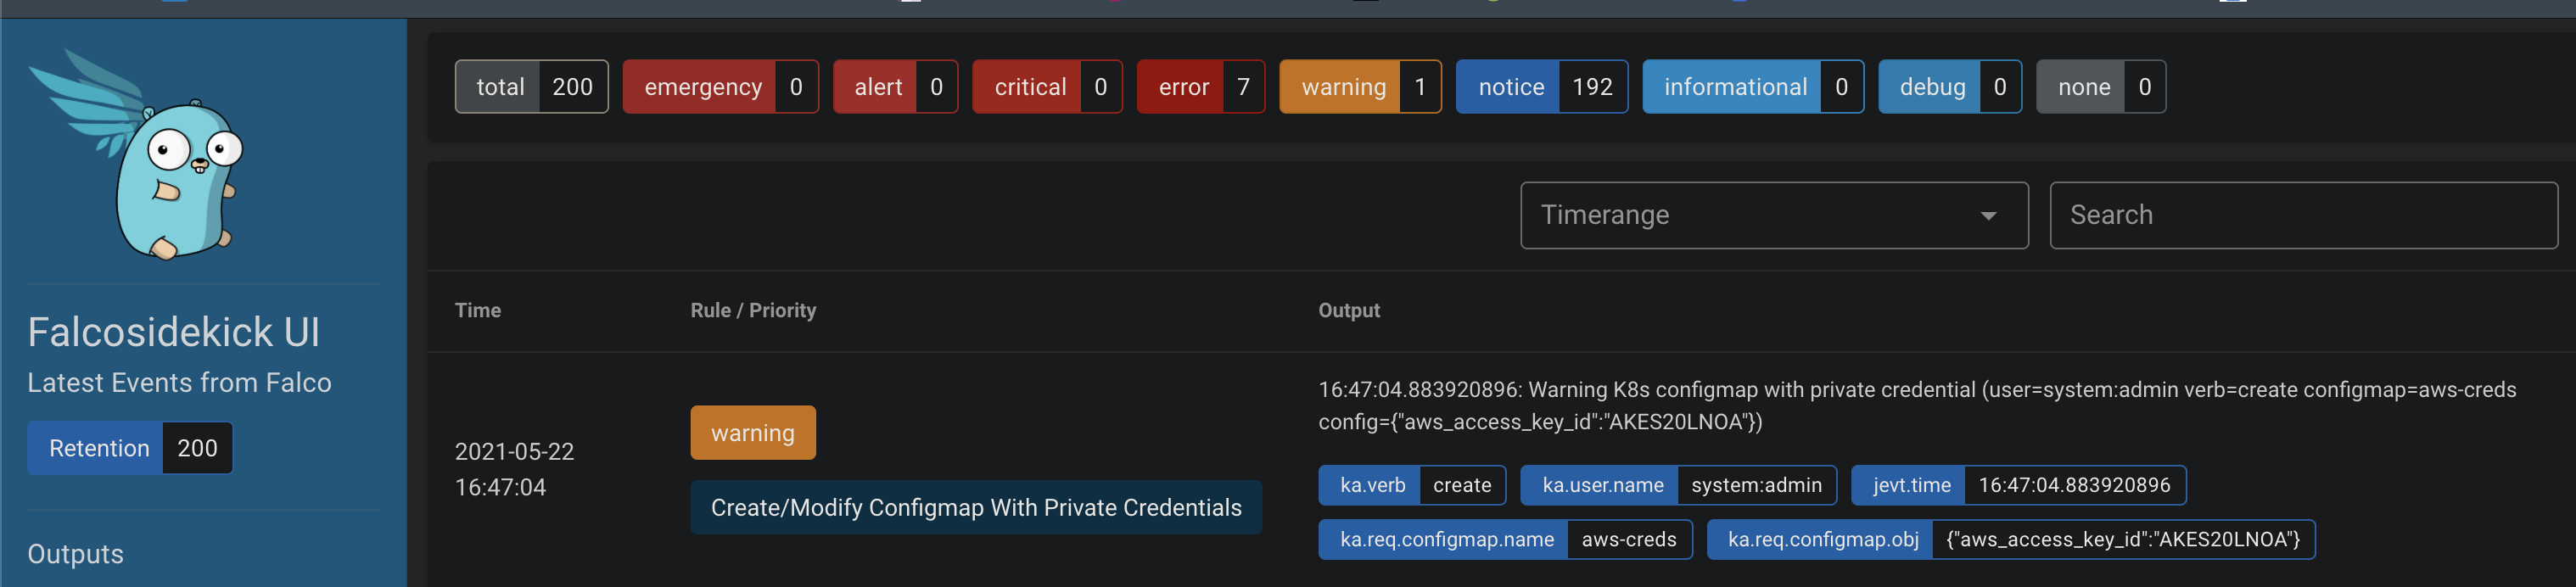
There is a rule called Create/Modify Configmap With Private Credentials in Falco for detecting ConfigMaps that contains private credentials from Kubernetes Audit Logs, you can see the details of the rule from this link. In order to test this, we should create a ConfigMap that contains private credentials, but before doing that, let's access the Falcosidekick Web UI to see what will happen once we create the malicious ConfigMap.
$ kubectl --namespace=falco port-forward svc/falco-falcosidekick-ui 2802
Forwarding from 127.0.0.1:2802 -> 2802
Forwarding from [::1]:2802 -> 2802
Now, let's create the ConfigMap.
$ kubectl create configmap aws-creds \
  --from-literal aws_access_key_id=AKES20LNOA
configmap/aws-creds created
As soon as you created the ConfigMap, Falco will detect that from the audit logs, and send an alert for that to the Falcosidekick. Finally, Falcosidekick forwards the alert to the Web UI. So, you should see a screen similar to the following:
Conclusion
With this really simple example, we only scratched the surface of possibilities, so don't hesitate to share with us on Slack (https://kubernetes.slack.com #falco) your comments, ideas and successes. You're also always welcome to contribute.
